
- Terrestrial Coordinates: exploring Planet Earth

Presentation
Presentation
At the start of this video, click on “Spanish” in the menu “Caption settings” for Spanish subtitles.
Watch the video as many times as you want.
How can we locate where we are on the Earth? We need a point of reference. Imaginary lines of latitude
and longitude are drawn on maps to describe where places are on Earth. In the video the Equator and Greenwich Meridian lines
are yellow.
The lines of latitude are parallel circles that go horizontally around the Earth. They indicate
the position north or south of the Equator The Equator is the middle line that divides the Earth into two equal parts. The lines of longitude go vertically from pole to pole. They indicate the position east or west
of the Greenwich Meridian. The world’s time zones are set from here. |
In the following activities we are going to:
- learn more about terrestrial coordinates
- find out about a human invention which can locate any point on the planet
- learn about different monuments -and make a recording in Google Earth.
Are you ready? Let’s get started!
|
|
Explore, create, publish and share

Activity 1
The GPS ( Global Positioning System).

Image from http://www.iminweb.com | A GPS is used to find our exact position on the Earth. Drivers, sailors and hikers regularly use them for navigation and to avoid danger. When travelling by car we reach our destination much faster thanks to these devices. Many of you will have used a GPS. In this activity we will share our experiences and talk about the uses of a GPS. |
In this sequence we will share our knowledge, experience and opinions about GPSs and also learn to value their use.
Continue reading!
Activity
If possible, bring a GPS to class. You can do some experiments, find some routes and talk about how it works.
Share your knowledge and experiences with the class and together try to answer these questions:
- Why do we use GPSs?
- Are they useful?
- How do they work?
- Have you used one?
- What was your experience?
- Do you have an anecdote about a GPS?
Rules for speaking in class:
- Raise your hand to speak. Your teacher will tell you when it’s your turn. If you all speak at the same time you can’t hear your classmates’ experiences.
- When a classmate is speaking, listen carefully. Even if you know what they are going to say, they deserve your attention as much as you deserve theirs.
- Don’t talk too much. Time in class is limited. Contribute your important ideas and discard the rest.
- Don’t remain silent. Contribute at least one idea or opinion. Everybody counts.
- Don’t make fun of anyone. Being rude contributes nothing to a debate. If you respect your classmates, they will respect you.
What is a GPS? Why do we use GPSs? How do they work? Explain what you know.
- Explain an experience one of your classmates had with a GPS.
Activity 2
A trip around the world. Part one.
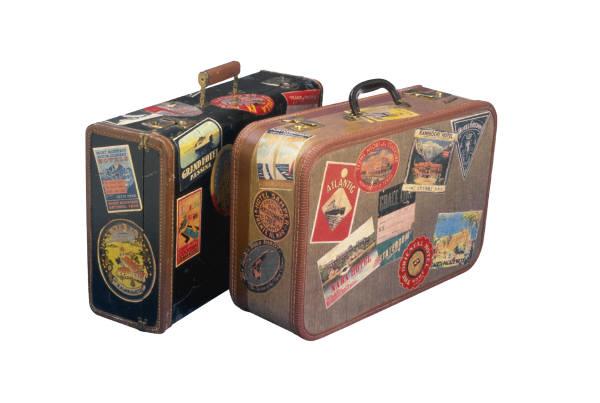
Image from: http://viajetips.com | In the last activity you learnt about your classmates’ experiences with GPSs. But, how does a GPS work? How is it possible for this small gadget to know our exact location and in which direction to go? Here you will find out more about terrestrial coordinates, a system which can locate any point on the planet by a numerical sequence. The GPS uses the system of coordinates to operate. |
In this activity you will make a record of eight UNESCO World Heritage Sites and understand the terrestrial coordinates system.
Latitude and Longitude
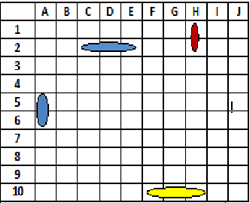
Many of you have played Battle Ships. This game consists of sinking your opponents ships using coordinates. For example, in the picture we can see a sunken ship in the coordinates H1 and H2 (in red) and a hit ship in the coordinates F10, G10 and H10 (in yellow).
In a similar way we use coordinates to locate a point on the Earth’s surface. One coordinate of latitude and another of longitude.
The latitude is the distance which exists between a point on the Earth’s surface and the Equator. It is measured in degrees, minutes and seconds. It is measured from 0 to 90º The points found north of the Equator are called North (N) and the points found south of the Equator are called South (S). The Poles North and south have a latitude of 90º N and 90ºS respectively. For example the latitude of Brussels, Belgium is: Latitude : 50º50’45”N |
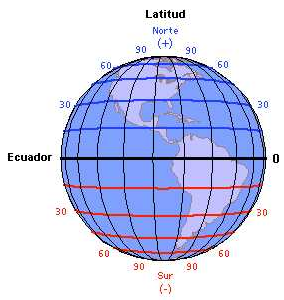
Image from http://almez.pntic.mec.es/~jmac0005/ ESO_Geo/TIERRA/Fotos/LongLat.jpg |
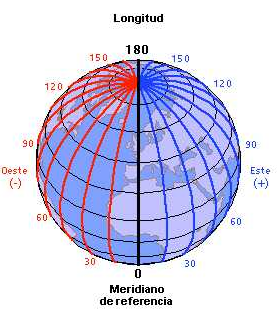
Image fromhttp://almez.pntic.mec.es/~jmac0005/ESO_ Geo/TIERRA/Fotos/LongLat.jpg |
The longitude is the distance which exists between a point on the Earth’s surface and the Greenwich Meridian. It is measured in degrees, minutes and seconds. It is measured from East to West and from 0 to 180º. So the points found east of the Greenwich Meridian are called East (E) and the points found west of the Greenwich Meridian are called West (W). p> The poles North and South do not have longitude. For example, the longitude of Brussels, Belgium is: Longitude: 4º21’20”E With the longitude and latitude coordinates we can find a city, a mountain or an island in the middle of an ocean in the same way as a boat in the Battleships game. |
These two coordinates indicate an exact point on the planet where a meridian and a parallel line cross. Thanks to these coordinates the GPS can operate correctly.
In this way the exact point to locate the city of Brussels is: Latitude: 50º50’45”N Longitude: 4º 21’20”E.
Activity
In this activity you are going to make a video to find a World Heritage monument. For this activity we will make groups of three or four people. Each group needs to locate a monument, write a short text about it, make a video and present it in class. For this activity we will use Google Earth.
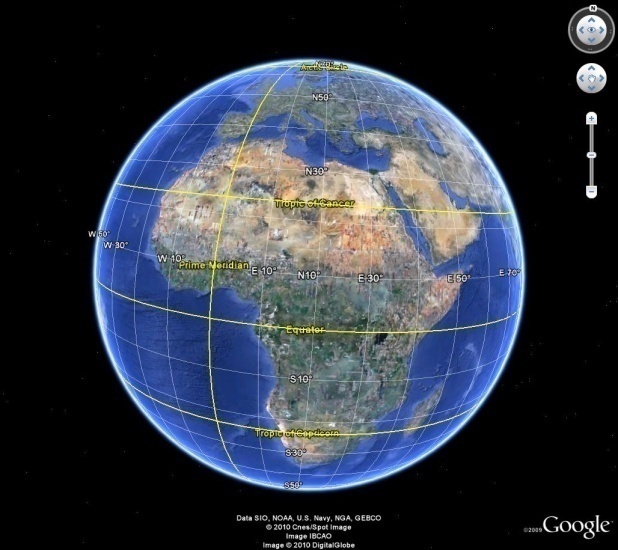
Image from Google Earth.
At the bottom of the screen you can see the coordinates of latitude and longitude. If you drag the mouse over the Earth you will see the coordinates change:
Remember what each coordinate means:
27º 10’ 29’’ N |
First the degrees are indicated with the symbol º then the minutes with the symbol ‘ , and then the seconds with “. The letter N means North. This coordinate refers to latitude because it indicates a position North or South of the Equator. |
78º 02’ 32’’ E |
The degrees º, minutes ‘ and seconds “ are shown as above . The letter E means East. This coordinate refers to longitude because it indicates a position East or West of the Greenwich Meridian. |
So you know what the letters S and W mean, don’t you?
Coordinates |
27º 10’ 29’’ N 78º 02’ 32’’ E |
41º 53’ 24’’ N 12º 29’ 32’’ E |
40º 20’ 37’’ N 116º 00’ 05’’ E |
33º 51’ 26’’ S 151º 12’ 55’’ E |
28º 58’ 44’’ N 31º 08’ 01’’ E |
48º 51’ 29’’ N 2º 17’ 38’’ E |
43º 19’ 23’’ N 3º 01’ 00’’ W |
40º 41’ 53’’ N 74º 02’ 39’’ W |
You can use these references to mentally visualise the location of a coordinate:
- At the Equator , latitude is always 0º.
- Latitude increases when we move North or South of the Equator.
- At the Greenwich Meridian, longitude is always 0º
- Longitude increases when we move East or West of the Greenwich Meridian
When you find your monument, save it with a Placemark:
The monument will be added to your Places list so you can locate it easily whenever you want to.
Note: If you select the “3D Buildings” option, you can see the monument in three dimensions.
Important: You cannot use the “Fly to” option to find these monuments. Use your knowledge of Terrestrial Coordinates.
Activity 2
A trip around the world. Part two
In this second part, you will look for more information about your monument, organize it and record a short description.
- Where can you find this monument?
- When was it built?
- Who built it?
- What is /was it used for?
- What are its most important characteristics?
You can find this information in http://es.wikipedia.org .
Make your text clear. Use only words you know and ask for help to formulate your ideas. Use the following structure:
- Introduction (one paragraph).
- Development (one or two paragraphs).
- Conclusion (one paragraph).
When you finish writing, read the text aloud with the members of your group. Make sure that the text is well structured and can be easily understood.
To record a video select the following icon from the top tool bar in Google Earth:
The recording buttons will immediately appear in the navigation window:
The left button starts the video recording and the right button starts the sound recording.
Some advice about recording: speak loud and clear. If you want to change the camera angle as you speak, do it slowly. If not, you will distract your audience.
Avoid sharp movements and excessive use of the zoom. If you can’t control the camara well, a static image is better. The idea is to present the monument not to demonstrate your navagation skills..
Remember, the written text is more important than the Google Earth images, so don’t try to make an action film.
Activity 3
Presentation and evaluation of the recordings
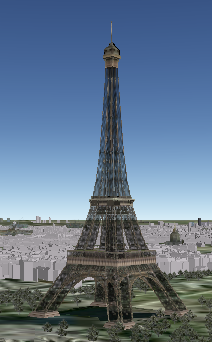
Image from Google Earth. |
It’s time to present your videos. In this activity you will see the work of all the groups. One by one, each group will present their monuments. Finally, we will evaluate the presentations and reflect on what we have learnt. You will have the opportunity to present the monuments and evaluate the recordings. Come on! Keep going! |
Activity
Help
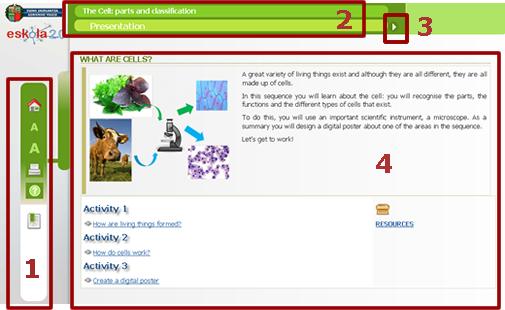
- Menu on left(in order from top to bottom): first page of the sequence (home) icon, letter size icon, print icon, help icon and index icon.
- Name of material and title of the section bar.
- Arrows for navigation (next or last page).
- Space for content.
Autor:
Lorem ipsum dolor sit amet, consectetur adipisicing elit, sed do eiusmod tempor incididunt ut labore et dolore magna aliqua. Ut enim ad minim veniam, quis nostrud exercitation ullamco laboris nisi ut aliquip ex ea commodo consequat. Duis aute irure dolor in reprehenderit in voluptate velit esse cillum dolore eu fugiat nulla pariatur. Excepteur sint occaecat cupidatat non proident, sunt in culpa qui officia deserunt mollit anim id est laborum.
Copyright:
Lorem ipsum dolor sit amet, consectetur adipisicing elit, sed do eiusmod tempor incididunt ut labore et dolore magna aliqua. Ut enim ad minim veniam, quis nostrud exercitation ullamco laboris nisi ut aliquip ex ea commodo consequat. Duis aute irure dolor in reprehenderit in voluptate velit esse cillum dolore eu fugiat nulla pariatur. Excepteur sint occaecat cupidatat non proident, sunt in culpa qui officia deserunt mollit anim id est laborum.
Resources
In this sequence we will be using:
A word processor |
|
Other applications |
|
Web References |
|
Other resources |
|
Google Earth
Click on the arrow to continue: