
- Separation of mixtures

DIRECTOR: Narcís Vives
COLLABORATORS:
- EXECUTIVE PRODUCER: Antonio Cara
- CONTENT MANAGERS: Mª Cristina Pérez and Magdalena Garzón
- COORDINATOR OF THE NATURAL AND SOCIAL SCIENCE AREAS: Elena Anguera
- TECHNICAL DIRECTOR: Maite Vílchez
- AUTHOR: Lorena Natalia Inzillo, María Inés Rodríguez and Miguel Poza
- CORRECTORS OF STYLE CASTELLANO VERSION: Anna Betriu and Joan Martín
- BASQUE ADAPTATION: Bakun itzulpen eta argitalpen zerbitzuak, s.l.
- ENGLISH ADAPTATION: Sarah Richards
- LAYOUT: Maite Vílchez and Miquel Gordillo
Presentation
Separation of homogenous mixtures
Everything that you see around you is matter and it can be in the form of pure substances or mixtures. Pure substances are, for example, water, alcohol, pure silver or iron.
Mixtures are everywhere! Perhaps you didn’t realise, but your houses are made with mixtures. Mixtures are in the food you eat, the clothes you wear and even in the air you breathe ;
Our lives are full of mixtures of every kind. Sometimes we need to make mixtures and other times, it is necessary to separate them into their original components. Let’s find out how! p>
The adventure begins!
Explore, create, publish and share

Activity 1
Types of mixtures
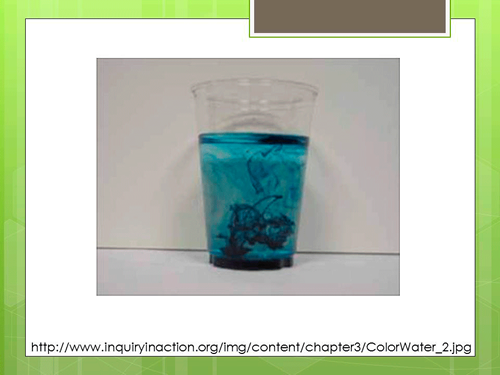
When we think of mixtures we think of mixing some substances with others. Sometimes, we can distinguish the substances after mixing. For example, we can distinguish the chocolate chips in chocolate biscuits. Other times, we cannot identify the original components. For example, if we mix yellow and blue paint we get green paint and we cannot distinguish the blue and yellow in the green paint. There are different types of mixtures and in this activity we will find out how to classify them.p> |
|
Activity – part one
To begin with mixtures, lets think about what we ate yesterday. Make a list of everything you ate for breakfast, lunch, tea and dinner. Remember to include drinks too!
Download the following table, (activity_1.zip) these questions will help you:
Breakfast:
- Did you drink milk or chocolate milk?
- Did you add sugar, honey or sweeteners?
- Did you eat white or wholemeal bread, toast or biscuits?
- Did you eat fruit or juice?
Lunch
-
Did you eat vegetable soup or rice?
What was the main dish?
Write down all the ingredients that you remember. If you don’t know how the food was prepared, ask a friend or an adult or ask the cook. Find out if they added salt, oil, vinegar or any other condiment and write in down too.
Do the same with tea and dinner.
When you finish, save the list..
Your list should look something like this:
| Breakfast | |
Drink: Chocolate milk | Ingredients:
|
Food: Biscuits | Ingredients:
|
Think about your breakfast… Did you use powdered cocoa? How did you make it? Did you put the cocoa in the cup, add milk and then sugar? Did you mix everything together? How many ingredients were in your drink? While you were drinking it, could you identify the milk or the sugar?
| Lunch | |
Drink: Water | Ingredients :
|
Starter Salad | Ingredients:
|
First course: Macarroni carbonara | Ingredients :
|
Second course: Veal and chips |
Ingredients:
|
Dessert: Meringue milk (see attached recipe: recipe.pdf) | Ingredients:
|
Let’s think about salad. What are the ingredients? Tomatoes, peppers, onions, asparagus, oil, vinegar and salt. But how many can you identify? Only tomatoes, peppers, onions and asparagus, because the dressing, oil, vinegar and salt are mixed in with the other ingredients.
The cocoa for breakfast and the salad for lunch are both mixtures.
So, what is a mixture?
It is the combination of two or more substances. But here are two very different mixtures
In the salad you can clearly see and distinguish some of the different components. This is aheterogeneous mixture, (where the word “hetero” means “different” because each part of the mixture is different). Heterogeneous mixtures consist of visibly different substances that can be seen with the naked eye and with a microscope.
In chocolate milk, it is not possible to see or distinguish the components. We see the combination of ingredients as one substance. This is a homogenous mixture (where “ homo” means “same”) it has the same uniform appearance and composition throughout. We cannot distinguish the different components with the naked eye or with a microscope
Do the following exercise to distinguish homogeneous mixtures, heterogeneous mixtures and pure substances: Types of mixtures
Activity 1. Part two
Types of mixtures: solutions

Think again about the salad: it has seven components but we can only distinguish four (tomatoes, peppers, onion and asparagus.) So, we say it is a mixture where four parts or phasescan be identified. In the case of chocolate milk, there are three components (milk, cocoa and sugar) but it seems there is only one. We can only see onephase. A phase is a visibly distinct portion of matter. So what can we conclude? That only one phase exists in homogenous mixtures. We also call these types of mixturessolutions.
Solutions can be obtained by mixing two or more liquids, liquids and solids or by mixing gases, etc.
In the case of chocolate milk, in the moment the sugar is added, we can no longer see it. In solutions this is called the solute the substance in the smallest amount. Once it is mixed in it seems to “disappear” because the solute dissolves.
The substance in the larger amount is called the solvent. In the case of chocolate milk, it is the milk.
Source:http://estudios-quimicos.blogspot.com/ 2010_06_01_archive.html
Activity – part two
In the example, as well as chocolate milk and salad, other food was included like, macaroni, meringue and water. Are these mixtures or pure substances? Why?
Talk together and decide. If you think they are mixtures, discuss which type of mixtures they are, homogenous or heterogeneous.
Remember your list of food and ingredients you made earlier. Now it’s time to include two new columns in your table. The columns will indicate:
the type of mixture (homogenous or heterogeneous)
and the quantity of phases.
Check to see if any component is missing from the column of ingredients.
Now you understand why it was important to consult the person who prepared the food. Only this way can you be sure how many ingredients and what components were included!
Follow these steps to add columns to your table:
Position the cursor in the last column of the table>
Select the menuTable, then Insert and finally Columns.

In the next window increase to 2 the number of columns and select Behind. Click on Accept.

Now your table is ready to complete!
When you have completed the table, do the following exercise. Check that your table is correct according to these answers: Select.
Actividad 2
Methods of separating homogenous mixtures: filtration and decantation
Mixtures and solutions
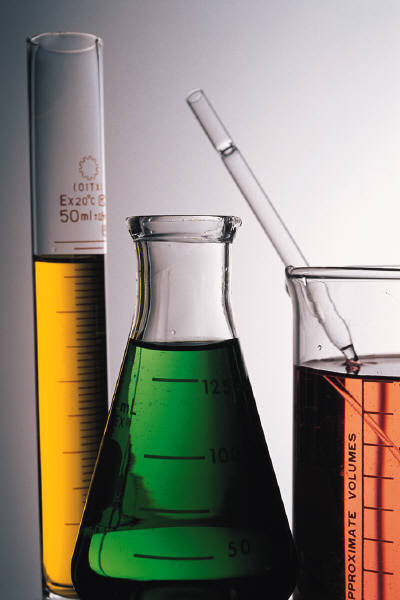
We make many mixtures, like the ones in the food in the previous activity. Some mixtures are already” prepared.” Can you think of some? There are lots in your house! Toothpaste, the paint on the walls, almond ice-cream, deodorant, glue, washing up liquid, paper, clothes fabric, etc.
So, is it possible to obtain the original components of a mixture?
Think again about the salad. What happens if we don’t like the onions? We can remove them with a spoon or fork. But it’s not always so easy. How would you remove the sugar from juice, if it was too sweet?
There are different methods to separate mixtures. We are going to analyse some of them.
Image from: http://medusa.unimet.edu.ve/ educacion/fbqi21/matraz.jpg
Activity
Filtration: is used to separate a solid substance from a liquid, normally, tiny solid particles which are dispersed in a liquid. The process is simple. The mixture is passed through a filter which lets the liquid pass but retains the solids.

You have seen filtration in your house many times without realising it. For example, when you use a strainer to separate the pulp to make juice or a colander to strain the water from pasta.
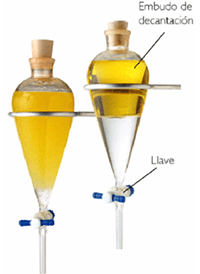
Decantation: is used to separate liquids with different densities. The mixture is left for the necessary time for the two components to separate (the densest liquid will sink). A decantation funnel with a stop cock is then used. When the stop cock is opened the densest liquid falls out and the stop cock is closed when all the liquid has fallen. In this way, the two components are separated.

EXPERIMENT
We are going to use these methods to separate some mixtures. Divide into groups of four or five members.
You will need these materials:
- Fine sand.
- Oil.
- Filter paper
- A funnel
- A beaker
- A decantation funnel
- A support
- A glass
- A small plastic bottle
Throughout the experiment you need to record a video of the procedures.
First, we will make the mixtures:
- Put water and fine sand in a glass and mix well
- Fill a small plastic bottle half with water a half with oil.
Record how you make the mixtures.
Now we have to separate the components. How?
For the sand and water mixture we will use the method of filtration. For the oil and water mixture we will use decantation.

Separation of sand and water. We are going to separate the water and the sand. As shown in the diagram, put the filter paper in the funnel and support it over a beaker. Whilst some of you set up the experiment, others need to record the video and make notes of the procedure, for a presentation, later on. When everything is prepared, pour the sand and water mixture into the funnel and wait until all the water falls into the beaker and the sand stays in the filter.
source of the image: http://3.bp.blogspot.com/ _LruEWdsfuaI/SnDke5St27I/ AAAAAAAAADQ/YeieTm-QZfQ/ s400/filtraci%C3%B3n.jpg
Separation of oil and water . We are going to separate oil and water. If you don’t have a decantation funnel you can make one by following the instructions inhttp://centros5.pntic.mec.es/ies.victoria.kent/Rincon-C/practica2/pr-53/PR-53.htm
Like before, some of you need to set up the experiment, others need to record the video and make notes of the procedure, for a presentation, later on. In all the experiments you must be careful. Treat the material with respect, don’t make brusque movements and be patient. For example, you may have to wait for the oil and water to completely separate in the decantation funnel.
First, we pour the mixture into the decantation funnel and wait for the oil and water to separate. When they are separated, place a beaker under the decantation funnel and open the stopcock. Let the first component out. Can you identify which one it is?
When all the first component is out, close the stopcock, change the beaker and open the stopcock again. In the end, we have two beakers, each with one component.
Do the following exercise: True or false.
Activity 3
Methods of separating homogenous mixtures: evaporation and distillation
Watch the following video to find out about evaporation:
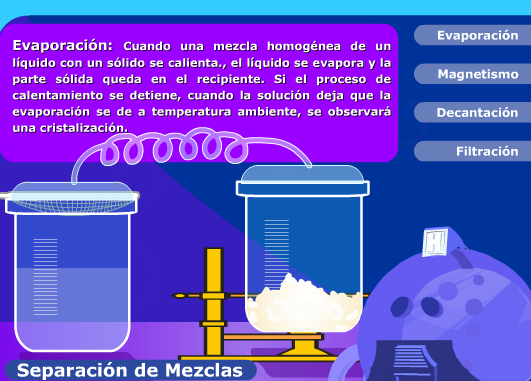
Click on the option Evaporation and watch what happens.
Did you pay attention? It explained the method of separating homogeneous mixtures, called evaporation which consists of taking advantage of one of the characteristics of liquids. When liquids are heated and reach boiling point they convert to vapour. So, when the temperature of a mixture of a liquid and a solid is increased, (in the video it is water and sugar), the water evaporates but the sugar stays in the recipient.
When all the liquid has evaporated, you can obtain sugar again. In this way the two components of the mixture are separated. The method of evaporation of the liquid component of a mixture allows us to obtain solids.
Although it may seem complicated, this process happens in your homes when you prepare soup and eat it over a few days. What happens to the flavour of the soup each time you heat it? Have you noticed that it is tastier or more salty? This happens because each time the soup is heated, the liquid evaporates and the salt and other ingredients remain. For this reason, the soup becomes tastier, saltier and thicker.
If you continue to evaporate the water, in the end you will be left with the salt and other solids that make up the soup, (pasta, vegetables, etc.) The same happened to the sugar in the animation.
Now think: what would happen if you didn’t heat the liquid? Could it evaporate anyway? If you want to find out, do this simple experiment :
Fill a glass half full of water. Using a permanent marker, indicate the water level. Leave the water at ambient temperature (in a place in the kitchen).
After a few days, see if the water level coincides with the mark you made. Yes or no? What do you think has happened?
This is also evaporation! Maybe you thought that evaporation only happens when water boils. Well no, not always!
Boiling is a phenomenon that occurs to all the mass of water when heat is applied and reaches 100ºC. Boiling increases the speed of evaporation, so the process is accelerated when liquid is heated.
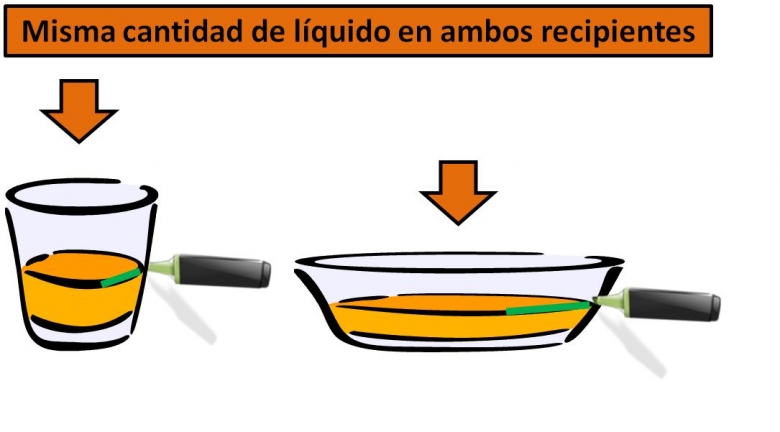
Evaporation occurs on the surface of liquid and can happen at room temperature. How fast can evaporation occur? This depends on the container and the surface area of evaporation. The larger the surface area, the faster the evaporation.
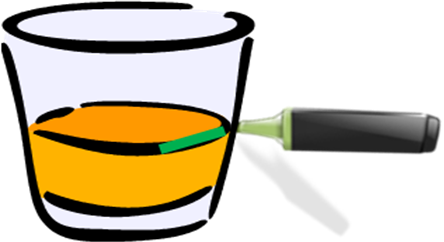
To check this, you can do a simple experiment. Place two containers, one with a narrow surface area, like a glass and one with a wide surface area, like a plate or a dish. Mark the water level on both containers. Observe them daily and register the changes. .
Now that we understand evaporation. What would happen if instead of keeping the soild part, we wanted to obtain the liquid? We would have to recuperate the vapour!
A method to do this is distillation.
Let’s see what this consists of.
In what cases can we apply the method of distillation?
This method is useful to separate the liquid component from the solid one, for example, water and salt. Distillation is also used to separate a solution of two liquids which boil at different temperatures, like water and alcohol.
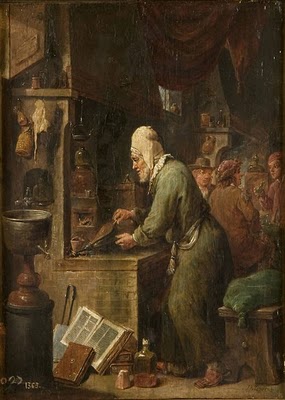
Ancient alchemist in his laboratory.
Distillation, like many useful practices in chemistry, owes its invention to the alchemists.
Schemes like this, explain that the process has existed since 300 A.D.
Source: http://saberparacomerlosdestilados.blogspot.com/ 2008/05/historia-de-la-destilacion.html
Watch this video to find out about the distillation of wine:
How does distillation work?

A simple distillation device
In the case of a solution of water and a solute, the mixture is placed in a fire resistant container.
In the image you can see a round distilling flask over a heat source. On heating the mixture, the water evaporates but the solute doesn’t, just as you have seen in the animation of evaporation: http://portal.perueduca.edu.pe/modulos/m_soluciones/laboratorio_hidratantes2.swf
In distillation, instead of letting the vapour escape into the air, it is cooled in the apparatus called the,condenser, consisting of two tubes, one inside the other. Water vapour passes through the inner tube and cold water circulates through the outer tube. As it cools, the vapour condenses and transforms to water which is collected in another recipient. Like this, the mixture can be separated and the liquid (water) component obtained. The solid component, (salt) remains in the original container.
Image adapted fromhttp://fraymachete-fq.blogspot.com/ 2008/11/destilacin-simple_13.html
Before going on to the final activity, consult other separation methods in this presentation Separación de mezclas and complete the following activity: Match.
Activity 4
Design and explanation of a simple distillation process. Explanation of experiments.
Now you know how distillation works. It’s time to put sound to the videos to improve your explanations. |
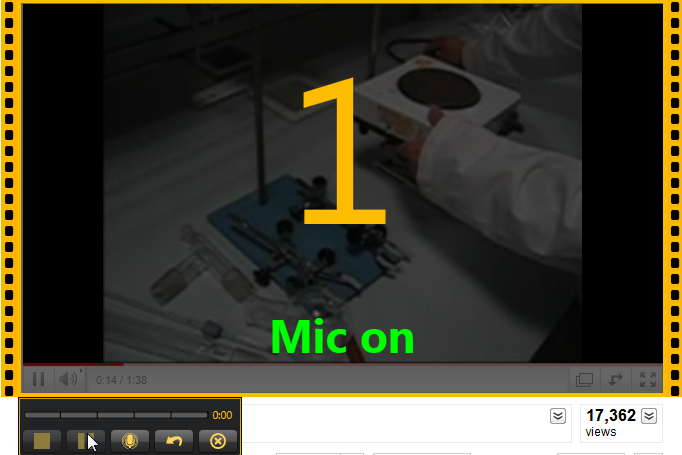
Sound-tracking a video with Jing |
Activity
We are going to make a soundtrack for two videos.
In one video we can see the setting up of a distillation apparatus :
In the other video we can see the steps taken to perform distillation :
Each group will work on one of the two videos.
Once you are assigned a video, watch it carefully and make a report about what you see. Make sure that you include:
In the first video:
What materials are necessary for the experiment?
How is a distillation apparatus constructed?
In the second video:
What is the basis for this procedure?
What are the steps?
What is obtained at the end of the experiment?
Write the script and check the timing as you watch the videos. You can make notes in your script about when to pause the video or make a pause in your report.
Once you agree on the script for the video. Get recording!
To record your soundtrack, you will use a program called Jing.
If Jing is not installed in your computers, you can download it at:http://www.jingproject.com
Consult thetutorial Jing for pupils which will guide you through 8 necessary steps to use the program.
Each group needs to present its video to the rest of the class together with the videos of the filtration and decantation experiments.
After watching the videos of the other groups, complete the co-evaluation document :co_evaluation.zip (.odt).
Help
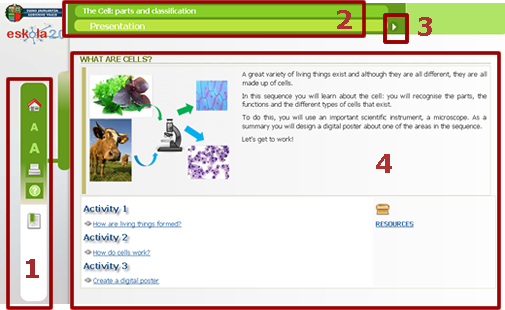
- Menu on left(in order from top to bottom): first page of the sequence (home) icon, letter size icon, print icon, help icon and index icon.
- Name of material and title of the section bar.
- Arrows for navigation (next or last page).
- Space for content.
Autor:
Lorem ipsum dolor sit amet, consectetur adipisicing elit, sed do eiusmod tempor incididunt ut labore et dolore magna aliqua. Ut enim ad minim veniam, quis nostrud exercitation ullamco laboris nisi ut aliquip ex ea commodo consequat. Duis aute irure dolor in reprehenderit in voluptate velit esse cillum dolore eu fugiat nulla pariatur. Excepteur sint occaecat cupidatat non proident, sunt in culpa qui officia deserunt mollit anim id est laborum.
Copyright:
Lorem ipsum dolor sit amet, consectetur adipisicing elit, sed do eiusmod tempor incididunt ut labore et dolore magna aliqua. Ut enim ad minim veniam, quis nostrud exercitation ullamco laboris nisi ut aliquip ex ea commodo consequat. Duis aute irure dolor in reprehenderit in voluptate velit esse cillum dolore eu fugiat nulla pariatur. Excepteur sint occaecat cupidatat non proident, sunt in culpa qui officia deserunt mollit anim id est laborum.
Resources
In this sequence you will be using:
Jing |
|
| Videos and animations |
|
More information |
Web sites Explanations of different types of mixtures and separation methods : |
Jing Tutorial
Click on the image to start:
Jing Tutorial
Click on the image to start:
Tutorial de Jing
Haz clic en la imagen para avanzar: